The key to describing dilations is knowing the scale factor that relates the preimage, or the original object, to the image, or the enlarged or reduced object. In this part of the lesson, you will investigate how to determine the scale factor that is being used for a given dilation.
Click on the screenshot below and use the interactive tool to dilate quadrilateral A. The slider that is labeled "Scale Factor" controls the scale factor used to generate the purple quadrilateral, B, from the red quadrilateral, A. Record your observations in your notes.
Interactive popup. Assistance may be required.
Additional Instructions


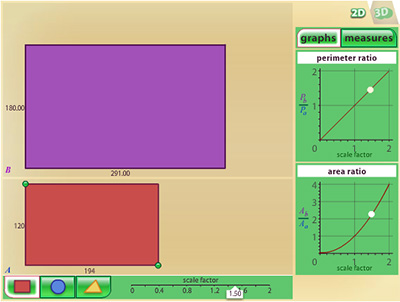
What do you notice about the ratio of the lengths of two corresponding sides and the scale factor of the dilation?
Interactive popup. Assistance may be required.
Check Your Answer
If you know the lengths of two corresponding sides in two similar figures, how can you determine the scale factor?
Interactive popup. Assistance may be required.
Check Your Answer
Use the interactive to complete the following table. For each of the given scale factors, click in the cell to indicate if that scale factor generates an enlargement or a reduction.
How can you determine whether a scale factor will generate an enlargement or a reduction?
Interactive popup. Assistance may be required.
Check Your Answer
Practice
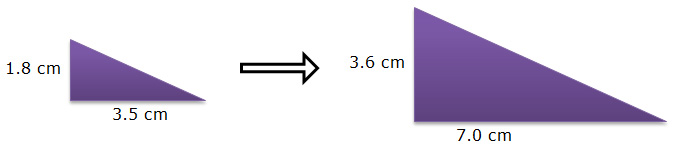
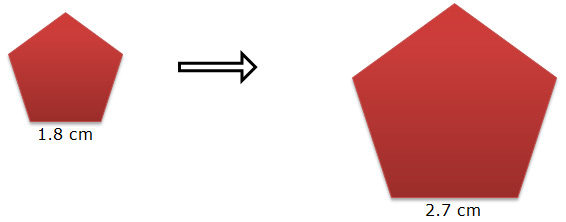
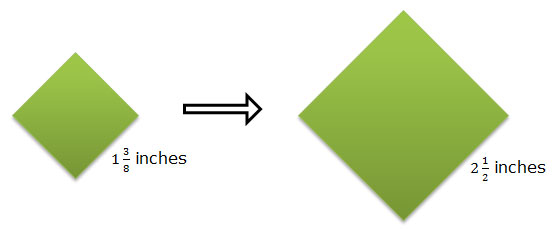
For each of the following pairs of similar figures, determine the scale factor that can be used to generate the dilation from the original figure.
Interactive popup. Assistance may be required.
Check Your Answer
Interactive popup. Assistance may be required.
Check Your Answer
Interactive popup. Assistance may be required.
Check Your Answer
